Blog
Navigation
Posts
Neomutt + Mutt-wizard + Oauth2 - Apr 14 2025
Introduction
For a good chunk of time I had Neomutt working off of app passwords for both my personal Gmail and Outlook accounts. Eventually, outlook just stopped working, so I wanted to get oauth2 working with Neomutt and add my university email which doesn't allow app passwords. There aren't any complete guides to doing this so here is instructions to get a setup like mine.
Dependencies
Here are the dependencies required for the setup I'm using with links to the packages in the Arch repository or the AUR. It should work if your not on Arch but the packages names can be different or require you to compile+install them on your own.
- isync - sync mail
- cyrus-sasl-xoauth2 - lets isync use xoauth2
- msmtp - sending emails
- pass - password manager
- notmuch - organizes emails
- neomutt - email client
- mutt-wizard - scripts for setting up email
Generating GPG keypair
Make sure you generate a keypair with GPG for pass before doing the next steps
gpg --full-gen-keyGenerating Tokens
microsoft:This one is easy, we can just use Mozilla Thunderbird's client ID, it doesn't have a client secret so just hit enter when you get the prompt to enter one
client-id: 08162f7c-0fd2-4200-a84a-f25a4db0b584
google:Unfortunately I couldn't get Thunderbird's client ID to work with google so we are gonna have to create our own. It doesn't cost any money and you can use the client-id for multiple emails, so if its block on one account you can just create them on another.
First, go to gcloud. Then Create a new project and name it something, I made mine just Neomutt.
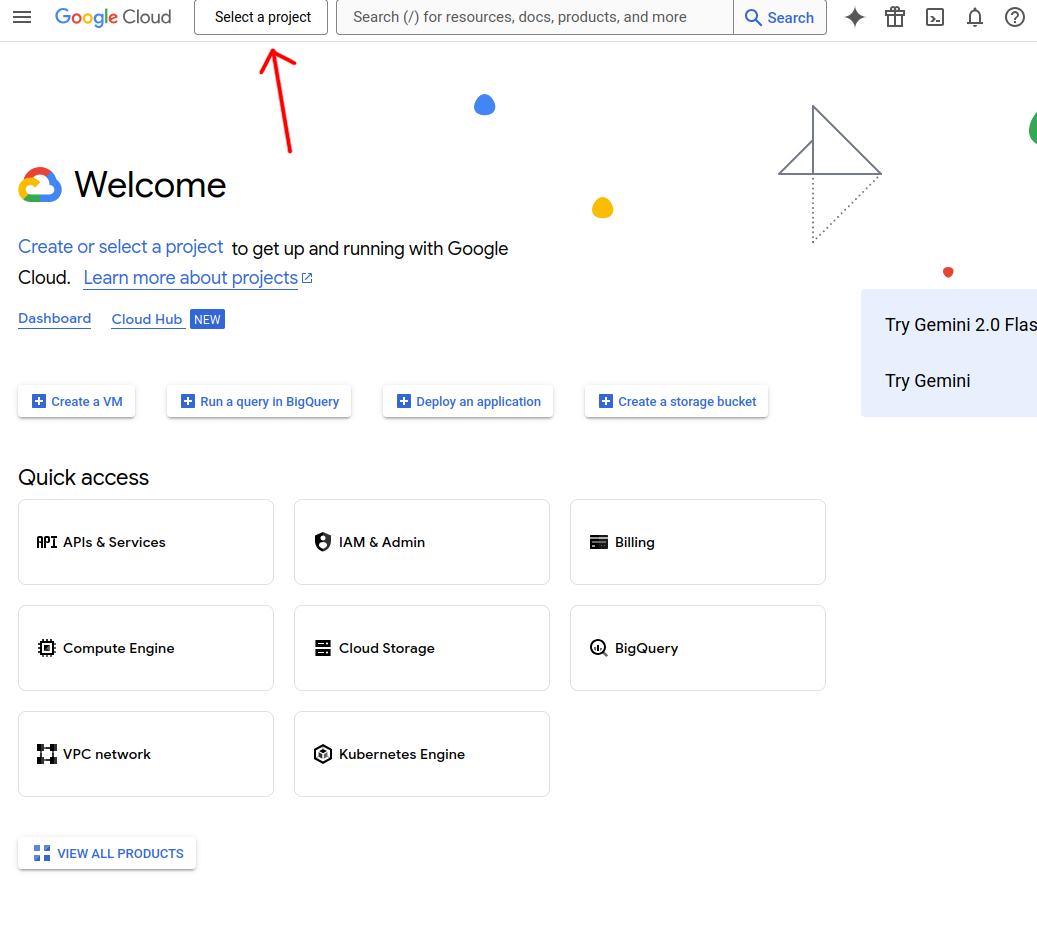
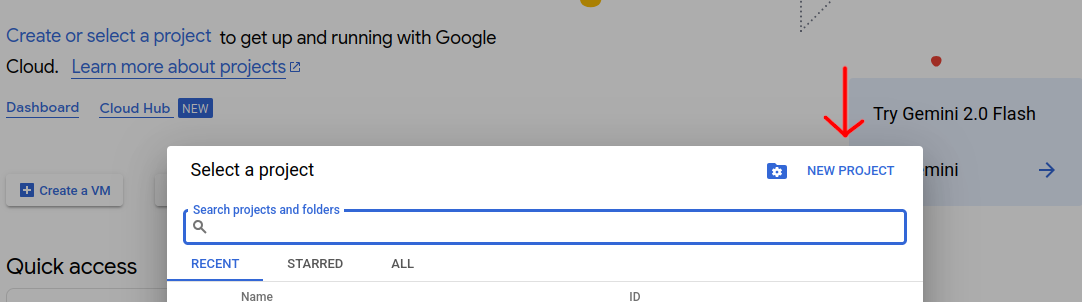
The UI in gcloud is super confusing so I don't know where this puts you after you create the project. We are looking for this page in API & Services in the Credentials tab.
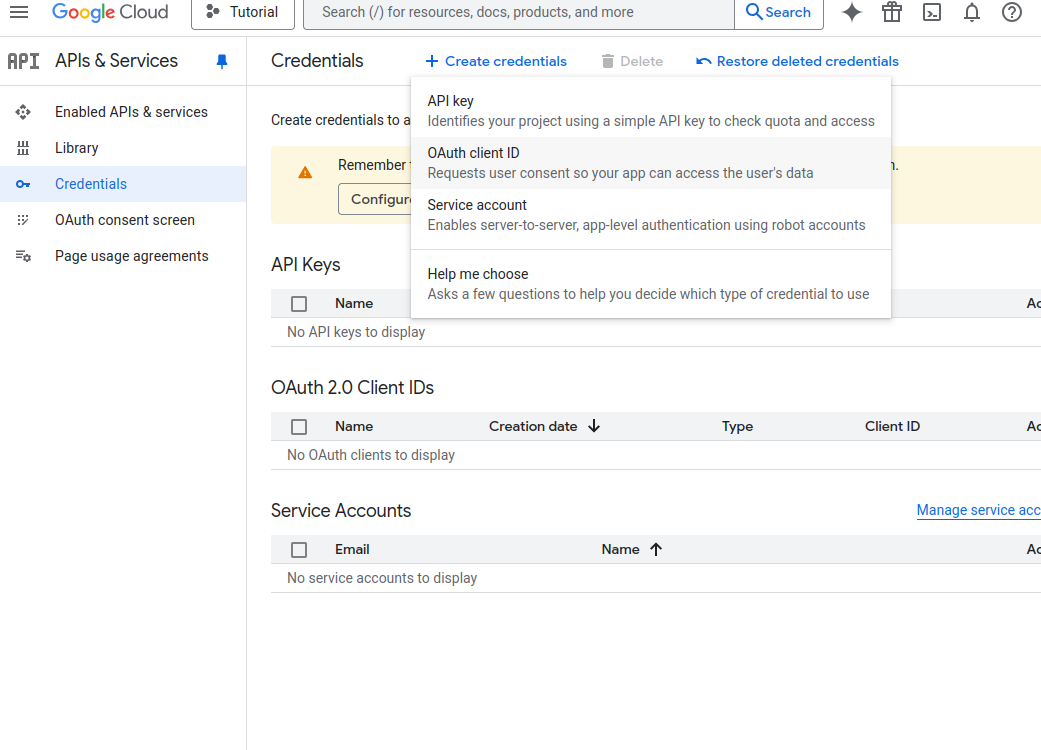
Then we create an OAuth client ID, it will make you setup some Auth stuff before it lets you make a key but once your done the summary screen should look like this with the information you need on the left.
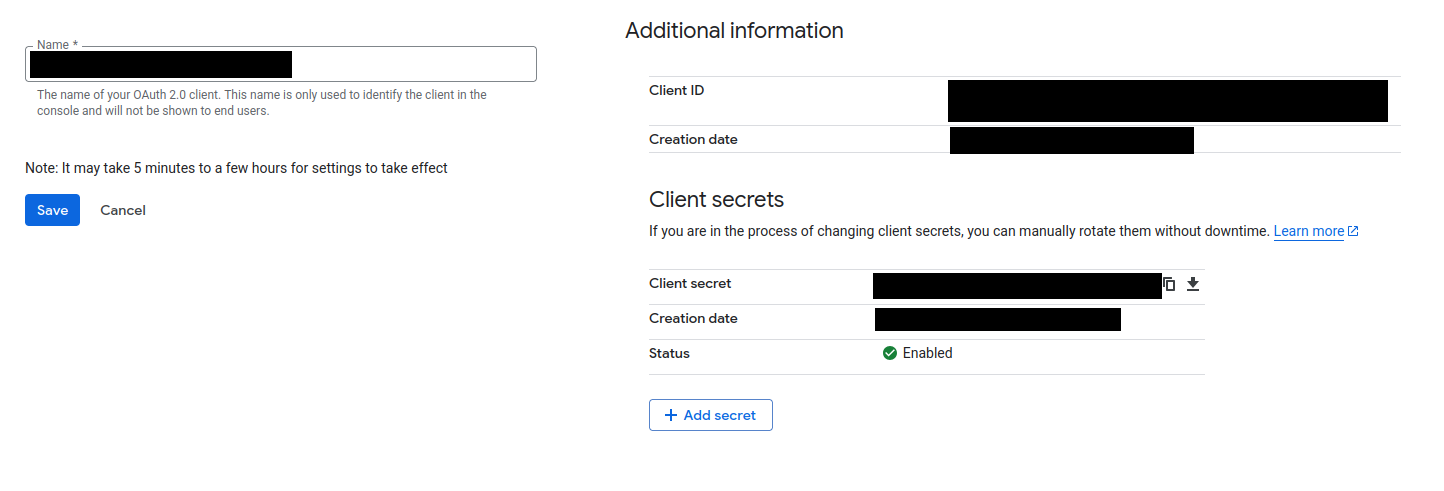
creating the tokens:
The script to generate/use the tokens is provided by Neomutt. The location is /usr/share/neomutt/oauth2/mutt_oauth2.py in Arch. To generate the token use this command. Use authcode so it gives you a URL to paste into your web browser. For google it will give you a whole setup up screen while with microsoft it will just have your code in the URL.
/usr/share/neomutt/oauth2/mutt_oauth2.py -v -t --authorize --client-id="{client-id}" \

 --client-secret="{client-secret}" --email "{your email}" --provider {microsoft or google} \

 --encryption-pipe "gpg --encrypt --recipient {your gpg key}" {output file}
Once you have the tokens stored somewhere (I put mine in ~/.config/mutt/tokens/) then we can use it to login, fair warning you will need to manually refresh the token when it expires with the command below.
/usr/share/neomutt/oauth2/mutt_oauth2.py --authorize {expired token file}"isync - mbsyncrc
Add your email to the mbsyncrc file, its can be in your $HOME folder or your $HOME/.config. You can manual set its location by exporting the MBSYNCRC variable. Make sure your change everything in the {}.
microsoft:
IMAPStore {your email}@outlook.com-remote

Host imap-mail.outlook.com

Port 993

User {your email}@outlook.com

PassCmd "/usr/share/neomutt/oauth2/mutt_oauth2.py {token location}"

AuthMechs XOAUTH2

SSLType IMAPS

CertificateFile /etc/ssl/certs/ca-certificates.crt


MaildirStore {your email}@outlook.com-local

Subfolders Verbatim

Path /home/{user}/.local/share/mail/{your email}@outlook.com/

Inbox /home/{user}/.local/share/mail/{your email}@outlook.com/INBOX


Channel {your email}@outlook.com

Expunge Both

Far :{your email}@outlook.com-remote:

Near :{your email}@outlook.com-local:

Patterns * !"[Gmail]/All Mail" !"*fts-flatcurve*" !"*virtual*"

Create Both

SyncState *

MaxMessages 0

ExpireUnread no
google:
IMAPStore {your email}@gmail.com-remote

Host imap.gmail.com

Port 993

User {your email}@gmail.com

PassCmd "/usr/share/neomutt/oauth2/mutt_oauth2.py {token location}"

AuthMechs XOAUTH2

SSLType IMAPS

CertificateFile /etc/ssl/certs/ca-certificates.crt


MaildirStore {your email}@gmail.com-local

Subfolders Verbatim

Path /home/{user}/.local/share/mail/{your email}@gmail.com/

Inbox /home/{user}/.local/share/mail/{your email}@gmail.com/INBOX


Channel {your email}@gmail.com

Expunge Both

Far :{your email}@gmail.com-remote:

Near :{your email}@gmail.com-local:

Patterns * !"[Gmail]/All Mail" !"*fts-flatcurve*" !"*virtual*"

Create Both

SyncState *

MaxMessages 0

ExpireUnread no
After adding them you can run mbsync -a to fetch the emails, you might need to mkdir if it errors out and can't find the folders. After that you can use mailsync to fetch emails.
msmtp
The config file should be $HOME/.msmtprc or $XDG_CONFIG_HOME/msmtp/config. Add your emails to the list
microsoft:
account {your email}@outlook.com

host smtp-mail.outlook.com

port 587

from {your email}@outlook.com

user {your email}@outlook.com

passwordeval "/usr/share/neomutt/oauth2/mutt_oauth2.py {token location here}"

auth xoauth2

tls on

tls_trust_file	/etc/ssl/certs/ca-certificates.crt

tls_starttls on
google:
account {your email}@gmail.com

host smtp.gmail.com

port 587

from {your email}@gmail.com

user {your email}@gmail.com

passwordeval "/usr/share/neomutt/oauth2/mutt_oauth2.py {token location here}"

auth xoauth2

tls on

tls_trust_file	/etc/ssl/certs/ca-certificates.crt

tls_starttls on
mutt/accounts
We are manually adding things to mutt-wizard as it doesn't support oauth2 by itself. In your .config/mutt/ you should have a file called muttrc and a folder accounts. The accounts folder will have configs for each one of your emails.
example: accounts/{an email}@outlook.com.muttrc# vim: filetype=neomuttrc
# muttrc file for account {your email}@outlook.com
set real_name = "{Your Real Name}"
set from = "{your email}@outlook.com"
set sendmail = "msmtp -a {your email}@outlook.com"
alias me {your email} <{your email}@outlook.com>
set folder = "/home/{user}/.local/share/mail/{your email}@outlook.com"
set header_cache = "/home/{user}/.cache/mutt-wizard/{your email}_outlook.com/headers"
set message_cachedir = "/home/{user}/.cache/mutt-wizard/{your email}_outlook.com/bodies"
set mbox_type = Maildir
set hostname = "outlook.com"
source /usr/share/mutt-wizard/switch.muttrc
set spool_file = "+INBOX"
set postponed = "+Drafts"
set trash = "+Trash"
set record = "+Sent"
macro index o "mailsync {your email}@outlook.com" "sync {your email}@outlook.com"
mailboxes "=Archive" "=Deleted" "=Drafts" "=INBOX" "=Junk" "=Notes" "=Outbox" "=Sent" "=Trash" # vim: filetype=neomuttrc
# muttrc file for account {your email}@gmail.com
set real_name = "{real name}"
set from = "{your email}@gmail.com"
set sendmail = "msmtp -a {your email}@gmail.com"
alias me {your email} <{your email}@gmail.com>
set folder = "/home/{user}/.local/share/mail/{your email}@gmail.com"
set header_cache = "/home/{user}/.cache/mutt-wizard/{your email}_gmail.com/headers"
set message_cachedir = "/home/{user}/.cache/mutt-wizard/{your email}_gmail.com/bodies"
set mbox_type = Maildir
set hostname = "gmail.com"
source /usr/share/mutt-wizard/switch.muttrc
set spool_file = "+INBOX"
set postponed = "+[Gmail]/Drafts"
set trash = "+[Gmail]/Trash"
set record = "+[Gmail]/Sent Mail"
macro index o "mailsync {your email}@gmail.com" "sync {your email}@gmail.com"
mailboxes "=INBOX" "=Trash" "=Unwanted" "=[Gmail]/All Mail" "=[Gmail]/Drafts" "=[Gmail]/Important" "=[Gmail]/Sent Mail" "=[Gmail]/Spam" "=[Gmail]/Starred" "=[Gmail]/Trash"
the mailboxes should be the defaults, but if you have some different setup or encounter some missing mailbox then add it to the list. The names should correspond to the ones in ~/.local/share/mail/{your email}.
mutt/muttrc
It should look like this in your muttrc.
# vim: filetype=neomuttrc

source /usr/share/mutt-wizard/mutt-wizard.muttrc

set header_cache_backend = "lmdb"
At the end of the 3rd line we want to source a email so it doesn't default to $HOME/Mail
# vim: filetype=neomuttrc

source /usr/share/mutt-wizard/mutt-wizard.muttrc

set header_cache_backend = "lmdb"

source /home/{user}/.config/mutt/accounts/{an email, ex: name@gmail.com}.muttrc
After that then you can add macros so that i + {index} will bring you to a different mailbox
# vim: filetype=neomuttrc

source /usr/share/mutt-wizard/mutt-wizard.muttrc

set header_cache_backend = "lmdb"

source /home/{user}/.config/mutt/accounts/{an email, ex: name@gmail.com}.muttrc

macro index,pager i1 'source /home/{user}/.config/mutt/accounts/{an email, ex: name@gmail.com}.muttrc!;' "switch to {an email, ex: name@gmail.com}"

macro index,pager i2 'source /home/{user}/.config/mutt/accounts/{an email, ex: name@gmail.com}.muttrc!;' "switch to {an email, ex: name@gmail.com}"
Conclusion
Hopefully this guide works for your setup or at least guides you in the right direction. If anything breaks then I'll try to update this blog post.